Cardboard Box Cars for Drive-In Movie Party: A How-To

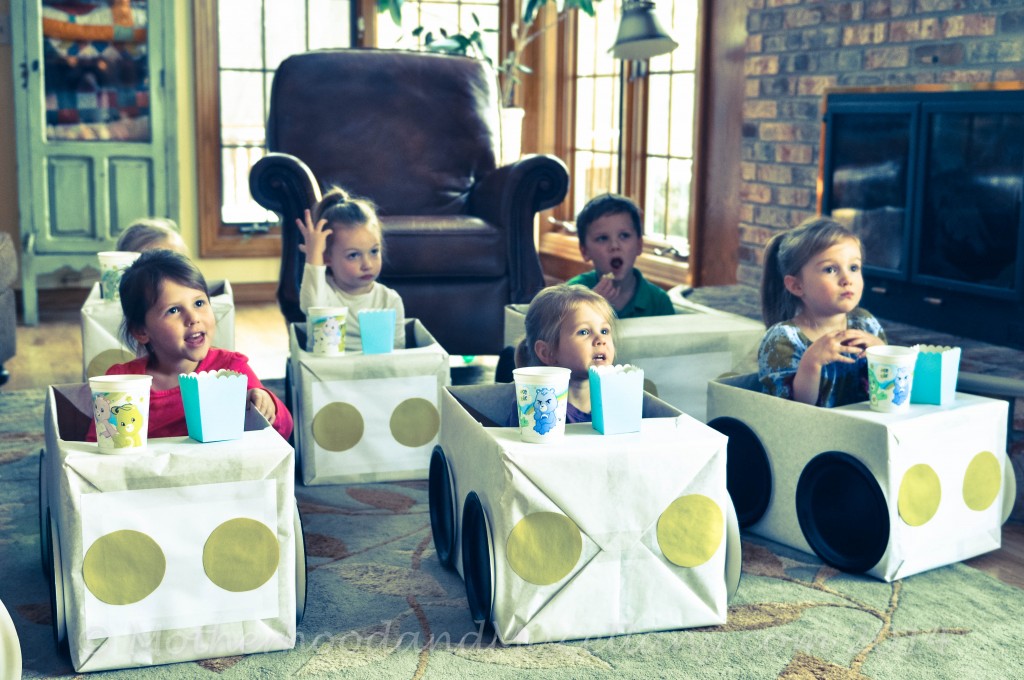
As promised in this post about Miss’s Brave-themed movie party, I am sharing with you how to make the cardboard box “cars” we used for the “drive-in” element of the movie. There are probably lots of ways to do it. But, though I found lots of sites with cute pictures of kids in their cardboard box cars, I couldn’t find any sources that told how to actually make the cars. So I had to figure it out for myself. I’m sharing here so you don’t have to if you ever decide to use this awesome idea (which you definitely should do).

Making these was actually quite easy, but to save you a bit of brain power, just follow these steps!

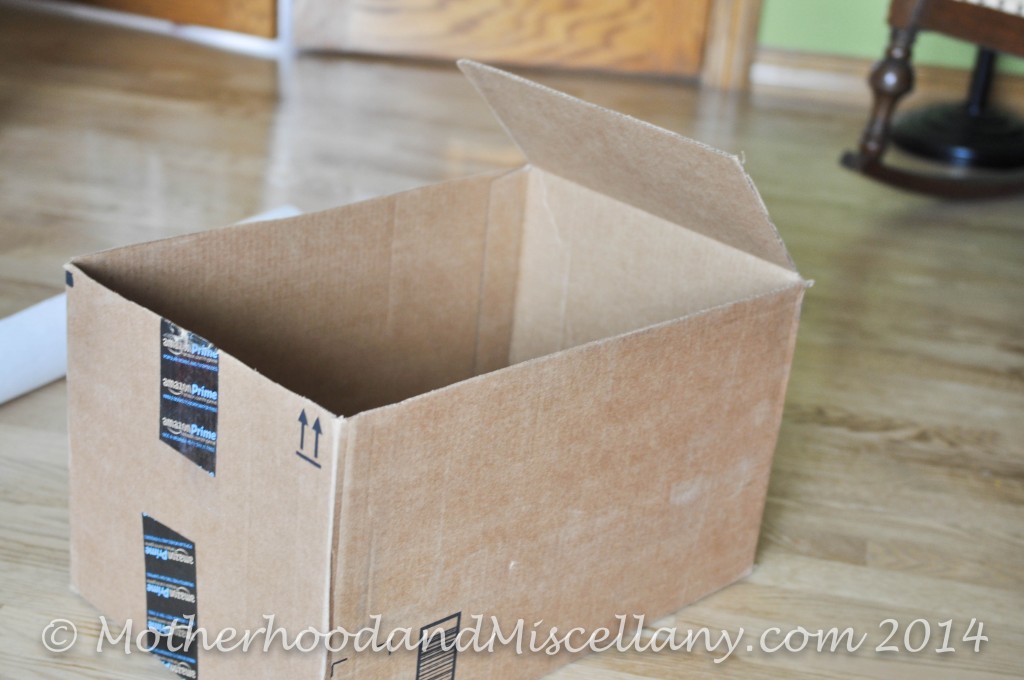
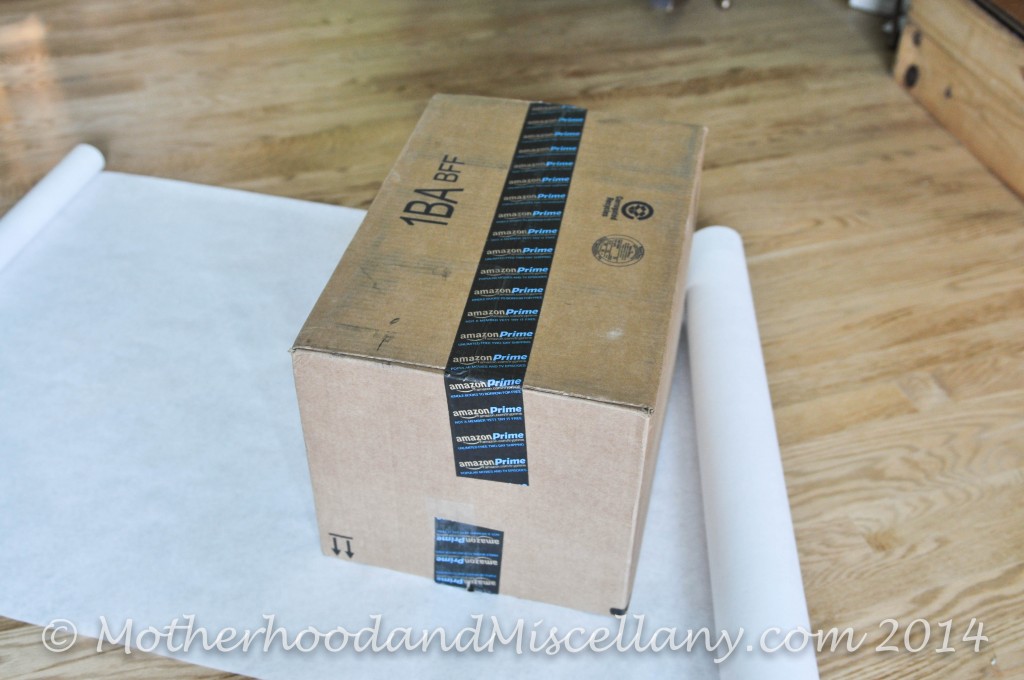
1. Plan ahead enough that you can save up the boxes you’ll need. This was probably the hardest part. Fortunately, I decided I wanted to do this for Miss’s birthday before Christmas, so I was able to save plenty of boxes from gifts we ordered (I love you Amazon Prime). But I still didn’t quite have enough. I wasn’t worried about the boxes all being the same size, just big enough for a small person to fit. In fact, for the two littlest (Sis and our little friend who is just a few days younger), I used a diaper box. I did manage to get enough (and may or may not have placed some largish orders from Amazon Prime to make sure I’d get more big boxes – kidding!) though I had Super Friend holding a box or two for me just in case.

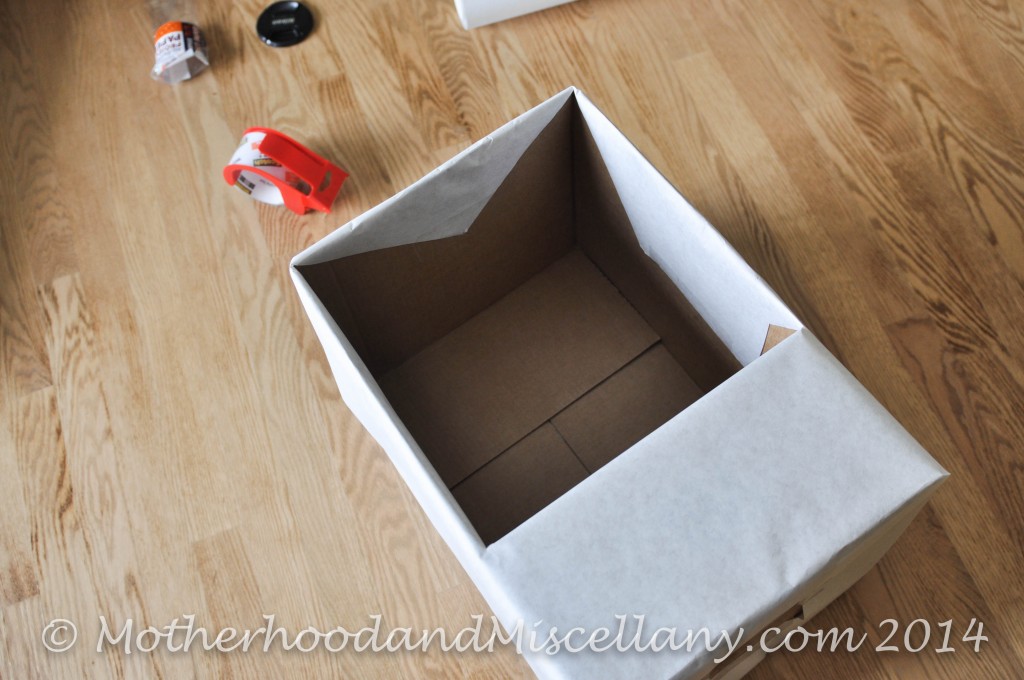
2. Anyway once you have enough, cut all of the flaps off each box except one per box on a short side. This will be your “dashboard.”

DSC_0582

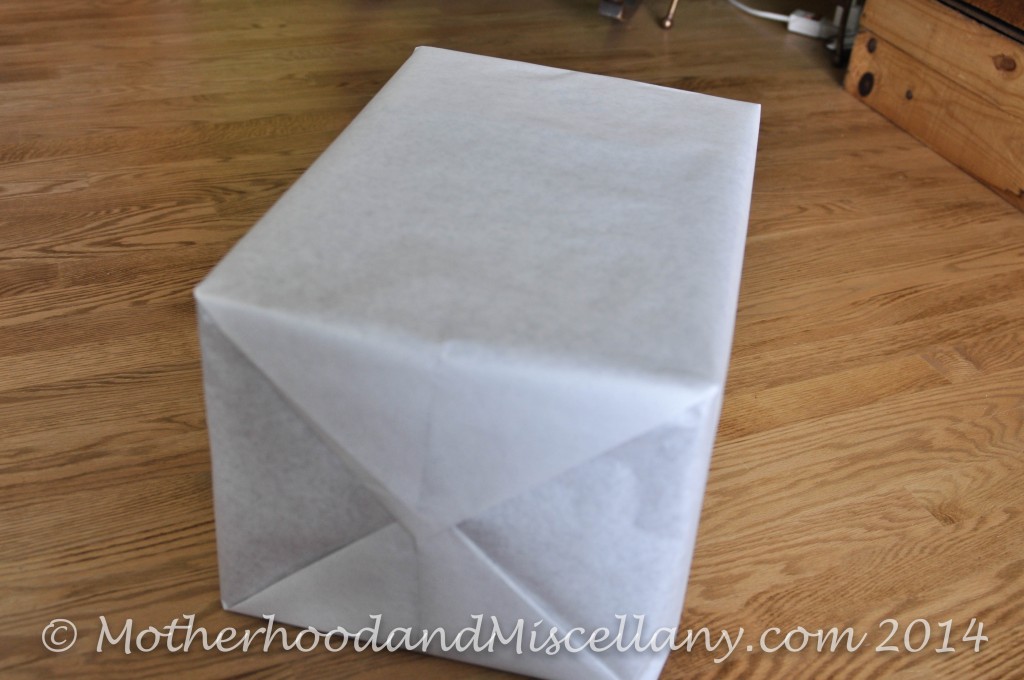
3. Get some paper to wrap the boxes. I stressed over what to use for this. I had some pretty purple and pink paper left over from wrapping books during Advent, but I didn’t think our one boy guest would go for that, and I didn’t want to make a different color just for him (wasn’t sure if that would make him feel cool or weirdly different), so I went to Hobby Lobby thinking I would get some of the huge rolls of paper they have for teachers to cover bulletin boards, maybe in red or blue. Except that those rolls of paper are expensive. So. I just went for a roll of inexpensive butcher paper. I think the roll I got was about $6 and it covered all the boxes with plenty left over.

DSC_0583

4. For each box, flip your one flap in, but don’t push it down (keep it parallel to the bottom of the box). Turn the box over and wrap it like a gift.

DSC_0584

5. Then you need to cut the paper to make the opening for a kid to sit in. I did this by poking my scissors through in the center, a few inches from the back wall of the car-box. I cut straight forward toward the “dashboard,” stopping an inch or two short of it. I turned the scissors and cut in a “T” out toward the sides, and then, just before getting to each side, I angled back toward the front and cut up to the corner where the dashboard flap meets the side. Then I went back to where I stuck my scissors in and cut a “Y” shape to the back corners of the box.

DSC_0585 DSC_0586

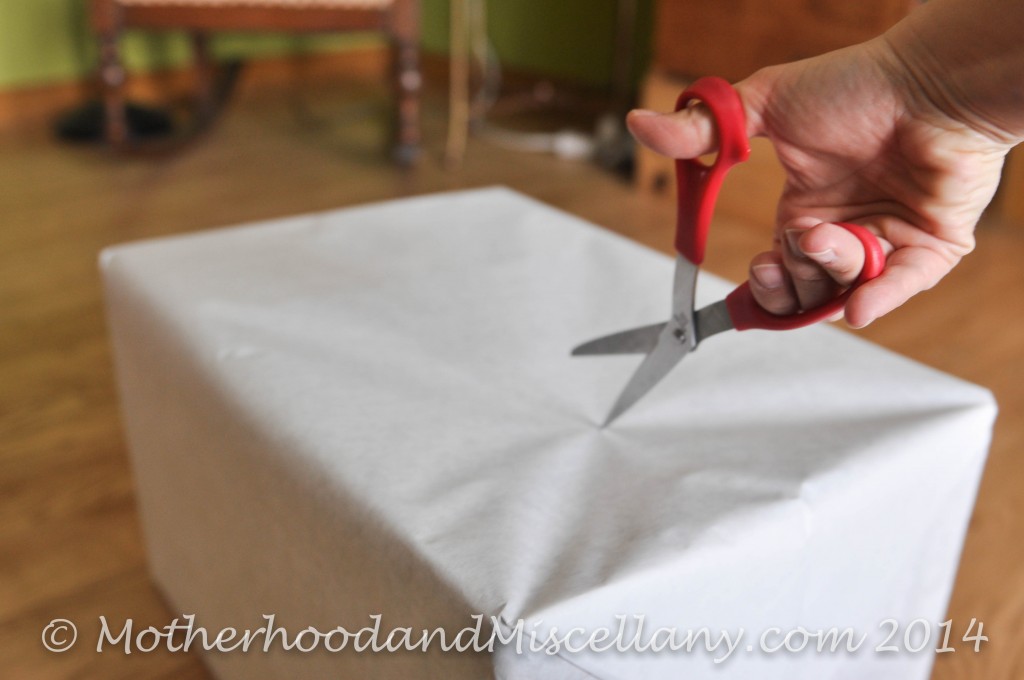
I know that sounds as clear as mud, and maybe I should have taken a few more pictures, but if you’ve ever wrapped a present, you can do this easily even if you don’t cut it exactly as described.

6. After cutting, tape the paper to the inside, folding it under the dashboard flap so it’s smooth. Note: I did not put any extra tape on the box to hold the dashboard in place. The only thing that the kids were setting on it was a box of popcorn and cup of water. Wrapping it this way made it sturdy enough, but if you need it to be stronger, I’d secure it in place with some tape.

DSC_0587 DSC_0588

7. Because I didn’t shell out mucho dinero for the huge paper rolls, some of the boxes didn’t get completely covered on both ends. I just taped a piece of printer paper over the spots where the butcher paper didn’t cover.

DSC_0659

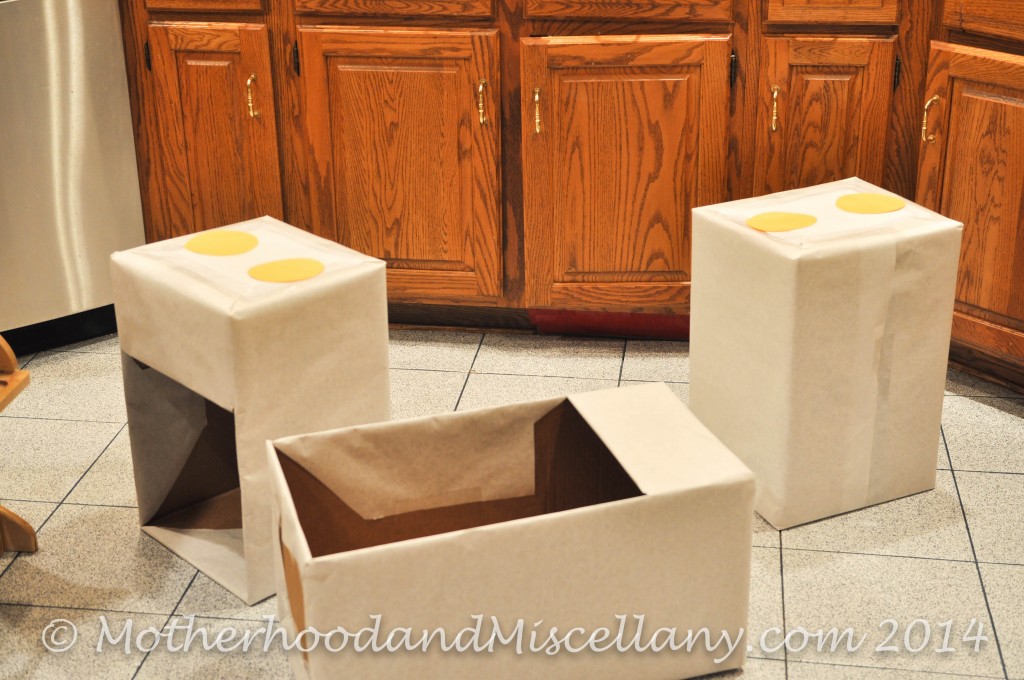
8. Add “car parts.” You could do this lots of ways. Cutting yellow circles for headlights and hot-glueing black paper plates for wheels was enough to give the general impression of a car. I had wanted to cut more paper plates and glue them on as steering wheels, put personalized license plates on the back, and use some shiny silver duct tape I bought (not regular duct tape, this stuff is fancy!) to make a grill or something on the front. But, I procrastinated, so I didn’t quite have time to do all the cute details I wanted to do.

DSC_0661


I still loved how they turned out.
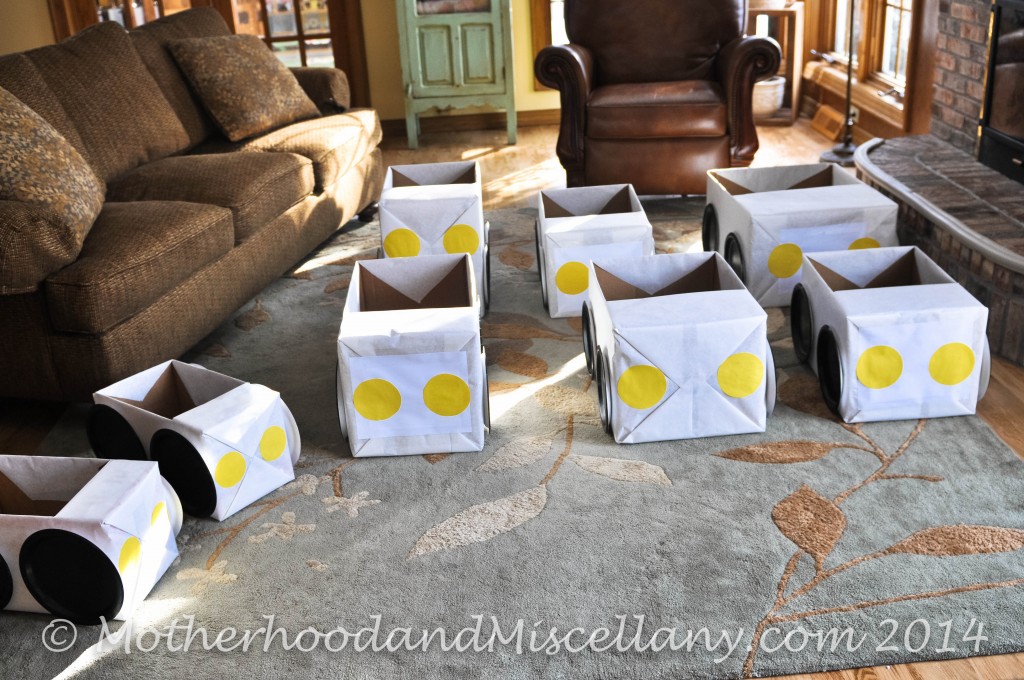
DSC_0582-2


The kids did too.


DSC_0599

A Horse-Themed Birthday Party, With Sparkly Tail Tutorial

I always love the process of planning themed birthday parties for my kids. I enjoy looking around for fun and inexpensive ways to bring a theme into a party. I realize that makes me sound like a big dork. I’m sure my girls probably wouldn’t really care if their parties were themed or not, but I like having them pick one anyway.

And though Lass later decided she wanted an okapi-themed party, she had originally requested a horse theme. So that’s what she got. It was a cute theme, and I found lots of good stuff to make it fun.

(Note: if you don’t care to read about how I planned the horse party and made glittery tails for seven kids under 6, feel free to skip this post. It’s all I’ve got for you tonight:)

One of my favorite finds was this personalized “Pin the Tail On the Horse” game poster. It was huge, sturdy, and only $10! I just used double-sided tape for the kids to stick on the tails that came with the game, and I had a simple paperback book about horses for the winner’s “prize.”

DSC_0484

I also got a pack of these ride-on horses for the kids to color and put together. I considered putting out glitter glue and paints for these, along with yarn to make manes and tails, but in the end opted for easy and not too messy – markers and some googly eyes I helped the kids glue on.

The horses ended up being kind of chintzy and hardly any of the kids actually pretended to “ride” their horses once made, but it was a fun enough activity and I was glad I had a little craft for them to do.

I also had some horse tattoos for the kids to pick and put on during the party.

And those three activities were the only “structured” parts of the party, other than eating pizza and cake. The rest of the time the kids just played, mostly on our trampoline.

At the end I had Lass pass out these favor boxes. She and Miss helped me make them by decorating them with stamps and stickers.

DSC_0539

Inside each of the boxes were more horse tattoos, a booklet of horse stickers, some horse-shaped lollipops, a horse finger puppet (which looks a little creepy in person), and a couple of little plastic horses.

My favorite part of the horse theme though, was the sparkly horse tails I made for the kids to clip on their shorts (or in their hair, but they all wanted them on their shorts).

DSC_0543

(This horse balloon and the cups/plates I got here)

I originally saw the idea for this here (lots more ideas here). A mom made tails for kids kids to use in the “Pin the Tail” game (I had originally planned to use them for our game too, but sticking with my keep-it-easy plan, I made a last-minute decision to use the little cardboard ones that came with the game instead). She used rubber bands instead of clips, so the girls could put the tails in their hair after pinning them in the game. But she didn’t provide instructions for how she did it other than to say she used different types of yarn.

So. I came up with my own way of making tails. I didn’t want to use rubber bands because I knew we would have some boys at the party. And I thought just using yarn would leave them a little flat, so I wanted to add some other textures too.

Here’s what I came up with:

1. Materials used – Different colors of yarn, including some that was sparkly, silver, and fuzzy, 3/8-inch ribbon in different colors (I got ribbon scrap packs at Hobby Lobby because I didn’t want to buy a bunch of whole rolls of ribbon), 7/8-inch ribbon (I used some gros grain I had from a previous project), double-sided tape, 1-inch alligator clips, and tacky glue (I also tried Elmer’s, but the tacky worked better).

DSC_0523

2. Start by cutting about 7 to 8 inches of 7/8-inch wide ribbon. Lay it down flat and put a piece of double-sided tape down the length of it.

3. Cut pieces of yarn and 3/8-inch wide ribbon to the length you want your tails (ours were probably about 12 inches), and start randomly placing the top part of these pieces along the tape, very closely together.

DSC_0525

4. After you have about 6 inches of yarn and ribbon laid out, stop adding and leave about 1.5 to 2 inches of the wide ribbon for wrapping up at the end.

DSC_0530

5. Place another strip of double-sided tape over the top of the yarn and ribbon.

6. Start rolling at the end where you don’t have extra ribbon left (the left side in my pictures). Roll the tops of the ribbon pieces all up in the 7/8-inch ribbon and tape.

7. When you get close to the end of the tape and the yarn/ribbon, put your alligator clip on.

DSC_0532

8. Keep rolling right over the inner part of the clip. When you get to the point of having about an inch of the wide ribbon left to roll, put some tacky glue on it and then roll it the rest of the way. Of course make sure you open the clip and roll it underneath so you don’t glue your clip closed in the roll of ribbon.

DSC_0533 DSC_0535

And that’s it! They were so easy and I love how they turned out. Most of the kids seemed to get a kick out of them too.

DSC_0541

Miss is already asking for a turtle theme for her next birthday. I kind of want to get started on it, but I suppose I should wait to make sure she doesn’t change her mind, since her birthday isn’t until February 🙂

Girls’ Rooms Made Over

As I have mentioned several times, I have been crafting stuff for the girls’ rooms for the past few weeks.  I think it has been my form of nesting.  I am finally near enough to completion that I can reveal what I’ve been working on.  Here’s a look at Lass’s room.

I’ve already posted about how to do the growth chart.  If you want to know how, see the tutorial here.

This is basically what Lass’s room looked like before (check out how tiny Miss is in this pic!).  All of my girls’ rooms had fairly pathetic wall decor, so I decided to use a few ideas from Pinterest, add a few ideas of my own, and make them much more fun and interesting.

I got the idea for the fabric rings from Pinterest.  They are so easy and cheap and really make a big impact I think.  I am not completely happy with the balance of the circles in Lass’s room, so tonight I made a couple more circles and will try adding them tomorrow to make it look better.  But I still love it even as it is right now.

I also spruced up the other side of her room.

This is what it looked like before.  I needed to take this huge rocker and move it to Baby Sis’s room, so I brought Miss’s old reading chair in and added some shelves.

I love the finished product.  My mom made these curtains!

Baby sis’s room still has a bit of work to be done, but the wall above her crib is done.

This used to be Miss’s room.  We were initially going to move Sis into our third bedroom, which was previously a guest room, but at the last minute decided to move Miss in there and put Sis in Miss’s room.  The main reason was because we couldn’t find a good place for the huge rocker pictured above in the other bedroom.

This was Miss’s crib that we converted to a full size bed when she moved into her “big girl bed.”  We converted it back and Miss got a new big girl bed you can check out below.  I made a couple of crib sheets for Sis’s crib and used the bed skirt that my mom and I (mostly my mom) made for Miss’s room before she was born.

The biggest transformation has been in Miss’s room.  We painted it this green originally to match the fabrics for Sis’s room, but the color works just as well with Miss’s new bedding.

In her old room, Miss had rails on the sides of her bed.  She was ready to have those taken off, as the only thing they have been needed to keep in her bed for the past several months have been all the “friends” Miss had been sleeping with.  I got these planter baskets from Hobby Lobby and they have been a perfect way to keep the friends within reach, though not right in the bed.

This was Miss’s reading corner in her old room.  The chair went into Lass’s room, Miss got a bigger chair, and the bookshelf stayed where it is for Baby Sis.  It’s attached to the wall, so Miss got a new book shelf.

Here’s Miss’s new reading/vanity corner.  I got her this cute little vanity to replace the dresser that was in her old room (which stayed in there to serve as a changing table for Baby Sis).

She has adjusted remarkably well to this move, considering we decided to do it kind of last minute.  She loves her new stuff, especially the vanity.  I also took some fabric flowers (left over from the arrangement I made for her that you can see below) and a few upcycled food cans (I made sure to remove all sharp spots) that I painted in coordinating colors, and I put them in one of the blue boxes on her shelf for her to use to make her own flower arrangements.  This has been a huge hit with her.

After all the shuffling around of rooms and furniture and all the crafting and sewing I’ve done (2 growth charts, tons of fabric circles, two crib sheets, and three large cardboard initials), I’m extremely happy with the results in all the girls’ rooms.  I have to give credit to my husband for all the work he did to help (moving lots of furniture, putting up a chandelier, putting together several pieces of furniture, and many other “Honey-Do” tasks). One of the projects I’ve been really happy with is the cardboard initials I did for each of the girls.  The initials came from Hobby Lobby.  I used Mod Podge to come up with three different looks for them.  They were all very easy.

For Miss’s I used torn pieces of scrap book paper and Mod Podge.  I just put the Mod Podge down before placing each piece of paper, used enough overlapping paper to cover the whole letter, and then put a final coat of Mod Podge over the top when it was all done.

For Lass’s letter I started by painting it green, and then cut out these flowers from the fabric that I had used to make her crib sheet.  The fabric flowers got Mod Podged in place, and then I again put a final coat of MP over the whole thing when it was done.

Baby Sis’s letter was done by just Mod Podging some of the leftover fabric from one of the crib sheets I made onto the cardboard.  This one was a little bit more tricky to figure out the best way to piece the fabric to get the whole letter covered and still looking nice.  I started by cutting strips of fabric as wide as the depth of the letter and covering the inner “V’s” of the N first.  Then I just used one big piece to cover the front of the letter and outer sides.  I had to wrap around a little bit, but it turned out great.

So, that’s what I’ve been doing for the past several weeks.  I still have a few more projects I would like to get done, but they don’t feel as pressing as these did.  Each of my girls has a pretty new look for her room, so I’m satisfied.

DIY Growth Charts

I have been trying to get a lot of stuff done for the girls’ rooms before Baby comes.  This week was my target week to get things done.  For various reasons, I haven’t gotten as much done so far as I was hoping, but I did manage to finish growth charts for both Lass and new Baby Sis.  
Here is the one I made for Miss about a year and a half ago.  

I made this because I wanted a growth chart for her room, but I could never find one I liked or that would even remotely coordinate with her decor.  Frankly, I thought that most of the growth charts available for purchase were kind of gaudy.  At least those I looked at were.  I didn’t find any kind of tutorial for making my own growth chart, so I pretty much winged it when I did this one.  It turned out quite well, so I just used the same process with the two new ones.  Read on if you’d like to know how to do it.

Here’s what I used to make them:

Two yards of canvas duck fabric. For Miss’s I used white.  For Lass’s and Sis’s I got the natural unbleached color.  This type of fabric comes in various colors, so you can use whatever color you like.

Gesso and a gesso brush (or maybe a roller?) – For Miss’s, because I used the white canvas and wanted the background of the chart to be white, I obviously used white gesso.  You can also buy clear gesso, and that’s what I used for the two I just made to keep the natural color of the fabric (you would of course use clear on a colored canvas too).  I think you can also tint gesso if you wanted a custom color, but I didn’t try this.

Acrylic paint and paint markers to do the actual design, letters, and measuring “ruler” along the side.  Also a set of brushes.

12-inch wooden dowels – 1/2 inch in diameter (2 per chart).

Paint for the dowels – I used off white paint to match the canvas.

Ribbon for hanging the chart – I used 7/8-inch gros grain ribbon.

Two-inch stencils for doing the lettering of the girls’ names.

I got all of the above items at our local Hobby Lobby, so none of it is that hard to find.  For equipment, I used a sewing machine, staple gun, measuring tape, large cutting mat, straight edge, and rotary cutter.

Iron the canvas and then cover an area with gesso about 52-53 inches long and 13-14 inches wide.  The canvas below has two gessoed strips around the same size.

Paint your dowels.  Let the gesso dry overnight and then use your cutting mat, straight edge, and rotary cutter to trim it to 12 inches wide and about 51 inches long.  You might want to make it a bit longer if you think your child will be taller than about 5’10”.  That’s the maximum measurement on each of my girls’ charts, and the extra inches are to allow for folding over the edges to make pockets to slide the dowels in.

Speaking of which, fold the ends over about 1-1/2 inches at top and bottom and sew in place 1/4-inch from the end, leaving two pockets (one at the top, and one at the bottom).  Then slide the dowels into the pockets.  Cut 2 lengths of ribbon long enough to tie at the top and staple them to the back of the top dowel.  Make sure to staple them on an angle so they will be easy to bring together and tie.  Now your chart is assembled and ready to paint.

Use the measuring tape and a paint marker to mark the measurements along the side of the chart.  I started with 2 feet at the bottom and mark 1/4-inch intervals up to the top.  

Then I use the stencils to put the girls’ names at the top of their charts.  I just eyeball the placement of the letters, starting in the middle of each name to get them approximately centered.  Be careful to not use too much paint so it doesn’t bleed under the stencil and make sloppy letters.  I am no artist, but I added my version of “shading” by putting a bit of darker color in a few spots.

After that, the rest is just painting what you like.  As I said above, I am no artist, so I kept it simple with each chart and just did flowers in slightly different shapes and colors to match each girl’s room decor.  Here’s Lass’s:

And Sis’s.

None of them are perfect, but I’m okay with that.  Though I wouldn’t be satisfied with a sloppy end result, I’m okay with some slight imperfections.  That’s what I call “character” and it’s all part of making things yourself for your kids, in my opinion.  If you make a mistake, just gesso over it and try again.  Of if you’re using clear gesso, just find another way to paint over your error.  Lass’s chart has a bumble bee in one spot where I accidentally slipped with some blue paint.  Sis’s has a leaf strategically placed to cover a drip of dark pink.  When I made Miss’s chart, I gessoed some extra canvas so I could practice what I was going to paint.  Do whatever works for you.

My next project was supposed to be making crib sheets for Sis’s crib.  I found these beautiful fabrics when visiting my parents before Christmas.

The whole color scheme of Sis’s room is planned around these fabrics.  Unfortunately, when I went to lay out the fabric to cut it for the sheets, I realized that this fabric is 44″ wide, and the pattern requires at least 45″ wide.  I’m quite annoyed with myself for this mistake.  I did the same thing with the first fabrics I bought to make Miss’s crib sheets, so you’d think I would have checked the measurements before buying this time.  Oh well.  I’ll get it worked out.  I found a few coordinating fabrics at JoAnn’s to use for some other wall decor for the room, so I will head back there and to a local quilting store to see if I can find some fabric that will work with the color scheme and be wide enough.

I’ll use the original, inspiration fabrics for window treatments or something.  Lots to do still with only three weeks until my due date!

Feeling Crafty

We went to the park on Friday for a play date.
Before I talk about how much fun we had, I must make note of the fact that these pants were the worst possible choice to put on Lass to go to a park where the ground is covered with mulch.

They’re not just fleece pants.  They’re extra fluffy, nubbly, super-fleecy fleece pants.  Watch, and take note.  Don’t put super duper fleecy pants on your kid if there’s mulch at the park.

A little while after I took the photo below, I put Lass in the sling so she could have a little snack.  The whole time I was holding her I was picking mulch off her pants.  I didn’t even make a dent in the matted, embedded mulch stuck in these things.  The big pieces came off, but the smaller fibers seriously got matted into the fabric and will not come off.  I took them off her the minute we got in the door, tried a little while longer to de-mulch them, and then put them in the trash.  They are that far beyond saving.  Who knew?

We did have a wonderful time at the park.  It was a great park.

And we were there with great new friends.  I just have to say how much I enjoy finding a new mom friend with young kids who is easy to talk to and fun to hang out with.

When we first moved here I hated that I didn’t know any other moms for so long.  It’s hard to be a new mom living far away from family and not really having any friends.  Over the years I have gradually met some really cool mom friends.  It helps more than I can explain to have other moms for support and just hanging out.  Friends who understand that when we get together, conversations will necessarily be fragmented, between corralling kids, wiping noses, answering questions from curious two year olds, excusing oneself to change smelly drawers, etc.  Friends who will grab your kid before she falls off the teeter-totter if you’re distracted for a second with another kid running the other way.  It’s an extra special bonus to find a friend with whom I have things in common besides just being moms.  The kind of friend with whom I laugh a lot and can talk about just about anything.  I have a few of these treasured friends.  Sometimes I don’t see them as often as I’d like, but I’m thankful to have them.  Friday’s play date was with a new friend (and her kids!) whom I think is going to be this type of friend.  It was a good day.

On a completely unrelated note, I have been feeling super crafty lately.  The other night, while watching Chopped, I made Miss a new tutu.  This weekend I finally finished a yarn wreath (I totally got this idea from another mom blog, Mrs. Priss) I have been working on for months.  This was the wreath in June.

I really struggled with getting the wreath covered with the yarn.  The straw wreath was not the best choice for this type of project.  I chose it because it was half the price of the foam wreath, and I thought it might be kind of cool and rustic looking.  It turned out looking fine (though not especially cool or rustic), but the extra hassle of getting it covered completely was not worth saving $3.  And I have to say I do not know the trick (is there one??) to working with yarn.  The above pile of tangled mess started out all nice and neat.  It repeatedly got tangled beyond untangling, and I had to cut it and start again more times than I’d like to remember.  Anyway, even after I finally got the wreath covered, I was so fed up with the project that I put it away for two months, until this week, before finally finishing it.  It took some nice crisp fall weather and a desire for a pretty fall-ish wreath for my front door to prompt me to pull it out, along with some great fall-colored felt.

I made a bunch of felt flowers.  Check out Mrs. Priss’s tutorials for these pretty and absurdly easy rosettes here.

Find Mrs. Priss’s pom-pom-looking flower tutorial here, and yarn wreath tutorial here.  I told you I got the ideas from her!!!  I’m totally giving credit where it’s due.

I love how it turned out!  I swore I wouldn’t make another yarn wreath, but I like this one so much, I just might.

Next time I’ll get the foam wreath though…

Tutus and Sleep

I decided that I wanted some tutus for my girls, so I went to my favorite resource, Etsy, to find some. Except that I couldn’t quite find just what I was looking for. And while most of the tutus could have been custom ordered, I realized that I could make some cheaper than buying them. So, I made a trip to my beloved Hobby Lobby the other day. And I went nuts in the tulle section.

While we were selecting the tulle, I was telling Miss that I was going to make her some tutus, and she got quite excited. Then every time she saw the pile of tulle on the counter in my laundry room, she kept saying, “My tutu!!” I’m not sure that she really understood what a tutu is, and I had to keep explaining to her that Mommy has to make the tutus first. After a day or two I got my act together and looked around online and found a few good tutorials. The one I chose to try was this one. I pulled out my rotary cutter and cutting board and went to town cutting strips of tulle.
Knotted it around the elastic, and voila! The hardest part of the whole thing was taming the static electricity while cutting and knotting the tulle strips.
And now, an update on the sleep in our house. I blogged before about my efforts to get Lass sleeping through the night without waking up and needing to nurse to go back to sleep. I am happy to announce that after only about 3 nights, we managed to cut out middle-of-the-night feedings. Hooray!
For about a week she was still waking up a few times at night and fussing a bit, but always managed to get back to sleep on her own. We have now had one night of 7pm to 7am sleep without waking, so I’m hopeful that will be the norm now. What a good girl!!
As for Miss, the transition to the Big Girl Bed has gone pretty well. The first night, as I posted previously, she went to bed with no trouble. She has continued to do wonderfully at bedtime. Naptime, on the other hand, was a bit of a struggle for a few days. Part of the problems was that I hadn’t really thought through how I would handle it if she repeatedly got out of bed (recall my complete denial that this transition would be happening in this decade and my resultant lack of preparation for it). So day one of Big-Girl-Bed naptime found her getting out of bed to play, over and over, and me repeatedly going into her room and putting her back in her bed. There was a lot of crying (mostly from her) and frustration (mostly from me). Finally I heard her yell, “I have a big poop on my bonnom!!” So I went up to change her diaper and put her back in bed and just decided to stay in the room until she fell asleep. I sat by her door and she was out in two minutes. However, I didn’t really want sitting by her door that to become a habit. So, for day two, I decided to try something different.
Day two naptime I decided to just let her get out of bed, figuring it was fine as long as she played quietly in her room and that she would wear herself out eventually, get into bed, and go to sleep. Except that it didn’t work out that way. She played for at least an hour and then started screaming that she had a poopy diaper again. I suspected this was just her way of getting me to come in her room, but went to check her diaper anyway. Sure enough, there was no poop. I had a brief discussion with her about the importance of telling the truth, and then put her back in bed and decided to try sitting by her door again. This time she popped right up from lying down and said, “Hi Mommy, what you doing?” In spite of attempts to get her to lie back down and sleep, I finally realized it just wasn’t going to happen, so day two was a complete nap failure.
I needed to regroup. I needed a plan. I remembered hearing about something called “Sleep Rules” in passing before. So I Googled it. I found info about Dr. Weissbluth’s Sleep Rules strategy and poster. It says to try it with kids 2.5-3 years old. But I figured Miss could get it, so I went for it. Here’s the poster I made.
I changed the Sleep Rules a bit from the ones Dr. W recommends, but these seemed more reasonable for her. She likes to chatter while falling asleep and I don’t see any harm in that, so didn’t want to make “Stay very quiet” a rule. We review the Sleep Rules before every naptime. After each sleep (nap or bedtime) that she follows the Sleep Rules, she gets a cool puffy glitter sticker to put on the Sleep Rules poster, and when she fills all the boxes, she’ll get to watch movie. I’m talking this up like it’s the coolest thing ever, since she’s never really seen a movie, and I was worried this incentive would be a bit ineffective. But she also gets stamps on her hands, feet, legs, etc., and sometimes another sticker from one of our books.
And it’s working!!! The first few days I still had to go in once or twice and put her back into her bed. I just said, “Stay in your bed” and eventually she did. Now she generally doesn’t even get out anymore.
So. Tutus, cool. Sleep, fine. But wait! Now I will connect these seemingly unrelated ramblings into a coherent, logical blog post.
As I mentioned above, most days the reward for following the rules is a sticker and some stamps. But a couple days ago, I decided to let the tutu be the reward. As I was putting Miss down for her nap I told her that if she followed the Sleep Rules today she would get to play with her tutu. She seemed so into the whole tutu thing, and I was so excited to see how much she would love the tutu I made for her. Unfortunately she woke up from her nap (she did follow the rules!) a little crabby.
She just wasn’t really into the tutu. At first she didn’t want anything to do with it. So I just put it on the floor and she decided it might be okay to sit on it.

She liked the way it feels.

She finally decided to put it on.
She got about this far and changed her mind. “I no yike it tutu.”
We left the tutu for a while. Had a snack. Went to gymnastics. Came home and had dinner. And then we tried the tutu again. She liked it much more.

She even shook her booty in it a bit.
In general, she doesn’t really love it as much as I thought she would. I was kind of expecting that she would put it on and refuse to take it off. She likes to play with it but doesn’t put it on much. But she is just at the beginning of the loving-to-dress-up phase. So the tutu will go into the dress up box and I suspect it will be worn as the dress-up love grows. She may be a fairy. Or a princess. Or a ballerina. Or something completely unrelated to tutus. I could see her as a tutu-wearing dinosaur or something equally fun. I will make more tutus. I have to. I still have 3 lbs of tulle in my laundry room.

Check out these fabulous pants

Yep, those are the pants I made with my own two little hands. Remember when I posted a few weeks ago about making Miss some pants like these? Well, I finally finished getting the ruffles on them last night and tried them on Miss today. I am seriously so proud of myself for finishing them so that they look like what I wanted them to, and for only about $5!! When I showed them to my hubby last night he said, “You made those? Wow, those are cool!” And not only did I make them myself, but the ruffles I did without a pattern! I had a basic pattern for the pants, which were easy, but then I had to figure out how big to cut the ruffles, how far apart to space them, etc. I already knew how to gather them evenly, because my mom showed me how to do that when we made Miss’s crib skirt last year. She also helped me decide on which size of the pattern to make when we discussed this project some time ago. Really my mom taught me everything I know about sewing, so thanks Mom! Check out how perfect the pants look on Miss.
She enjoyed trying them on today and flounced about a bit, kicking her legs to admire the ruffles.

As much as I am pleased with how the pants turned out, I do need to shorten the waist elastic a bit. I was so concerned about making the pants big enough to fit over Miss’s cloth-diaper-fluffy bum, that I ended up leaving the waist elastic just a little too long and the pants kind of fall off a tad. I also plan to make a few changes to the next pair I make, like double folding the hem on the ruffles and serging all the seams if I can get a serger, because I am having a slight problem with fraying on this pair. Otherwise, I’m thrilled with the result of this project and really want to make more. First though I need to get some things done for Baby Girl’s room, like her crib sheets, crib skirt, and a new cover for my boppy. So, no more baby couture until I have those projects done, hopefully soon. Then, more pants and maybe some bloomers too!

Update and Cuteness

Okay, so I promised a while ago to give an update on the projects I blogged about several weeks ago. For starters, the growth chart. I got canvas and dowels and ribbon, gessoed it the canvas and cut it to size, painted the dowels, sewed pockets for dowels in each end, and attached the ribbon. Pretty good progress, except that it has been in this stated for weeks now:

I am completely stalled out on the final and all-important step of actually painting the design and the measurements on the canvas! I’m terribly artistically impaired, at least when it comes to this sort of painting. So I am very afraid that I will completely mess it up! My painter friends have assured me (and logically I know this to be true) that if I do mess up I can just paint over it. No biggie. Yet I continue to put off the last step in completing this project. I have gessoed an area on a leftover piece of canvas to practice on, so hopefully I can get past my fear and just get it done soon.

On to my bedroom project. I had mentioned that I bought a pattern and was going to find some fabric to make my own duvet cover for our master bedroom. Here is the fabric that I fell in love with.
And here is the finished project
Lucky for me, I didn’t actually sew a stitch in this project! See, I found the fabric I loved, but then could not justify the cost of purchasing the amount of fabric that my pattern said would be required. It would have cost over $400 just for the fabric, and I still would have had to sew the darn thing! So, I made the decision that I just had to look harder for an already made duvet that I could live with. I had almost decided on one that I found on clearance from Pottery Barn when, in a last search online, I stumbled upon the duvet in the above photo! I was thrilled to find it for less than half of the cost of buying the fabric to do it myself. And none of the work, of course! How serendipitous! Mark another project “Done.”
Finally, I just couldn’t resist adding some of today’s cuteness to the end of this post. We had a cold rainy stay-inside kind of day today. Miss woke from her morning nap with the funniest bed-head and bewildered look. And I can never resist the opportunity to take pics of her in a cute diaper and baby leg warmers.


Progress

Today was both a lazy and productive day. It was more productive than lazy I suppose, but we did have some family down-time during the ACC Championship basketball game. Duke (our team) played Georgia Tech for the championship. It was a pretty ugly game, but Duke was victorious and we were happy. We had fun all sitting on the floor playing with Miss and her newly discovered and loved stuffed animals. She has previously been fairly oblivious to her stuffed animals, once in a while maybe jumping on one with a bear hug, but for the most part ignoring them. Lately she has been playing a lot with her stuffies. In particular, she loves to carry several of them around with her. She will carry and/or drag any of them that are small enough to be carried, but she especially loves her beanie kitty and beanie bear. These are just the right size for her to carry one in each hand. Today she especially seemed to enjoy snuggling with her stuffies and sitting in her “Daddy chair” where she reclined in the crook of my husband’s armpit as he lounged on the floor with her. I wish I had taken a picture, but I was just soaking in the family time and, honestly being too lazy to get up and get my camera!
But, there was lots of productivity today too! A few posts ago I mentioned the projects I wanted to get finished before finding out Baby’s gender and getting to work on his or her room. One of the first things I wanted to do was to finally finish Miss’s room. Now you may wonder why in the world her room is just getting finished when she’s nearly 13 months old. Well, let me explain. When she was born we were living in a rental house while we were searching for the perfect house to buy. We did have a completed nursery for her in that house, that I had put together in my nesting phase before she was born. Miss was about 3 months old when we moved to our current house. I got her room set up nicely, but we didn’t really have it finished or get anything put up on the walls because the walls were green and we needed to wait until we could get her room painted. We finally did that this past fall. Since then I don’t really have a great reason that her room didn’t get done. But in the past several months I have put up a few things on her walls, found a bookcase and gotten Hubby to put it together, and finally made a decision about whether to change the furniture arrangement in the room or not (the decision was to change it). So, here we have the before and after photos. The room still needs a few touches. I need a couple more items to put up on the walls, though I haven’t found what I want yet. I also need to put up the growth chart when that gets done. That will go next to the new bookshelf, which you can see below. So see what you think!
This is view from the door into Miss’s room
Before
Kind of blah. No good focal point (except the adorable baby of course!).

After
Much better! In case you missed this in my earlier post, my mom made that quilt for Miss.
The wall across from the window.
Before

After
Not too much different, but the addition of the shelf with the pegs to hang Miss’s tiny crocheted sweater and antique baby spoon from my mom, plus her initial letters on the shelf (they’re hard to see in this photo, but they’re there) add a lot to this part of the room.
This is the wall adjacent to the door into the room.
Before

After
So much better with the bookcase! The growth chart will go between the bookcase and the door.
And speaking of the growth chart, here’s the first stage of work on it. I got the gesso on the canvas today and the dowels have been painted. Now I just have to cut it to the size I need, get crafty with my paints, attach the dowels at the top and bottom and put the ribbon on to hang it.
As for the other project, my big sewing effort for the master bedroom, I have been ordering and comparing fabric swatches. I think I’ve decided on the fabric for the duvet, but the swatch I got was so small I had to order a yard of fabric to see if the colors and pattern are really what I want. So, I’m making some progress there too. The fabric should be here tomorrow or Tuesday at the latest. I can’t wait!